


Fall is here at last. And with great optimism, I recently started the task of pulling my warm-weather clothing out of hibernation. Unfortunately, when I dragged the overstuffed storage bags out from underneath my bed, they ripped wide open. Lovely.
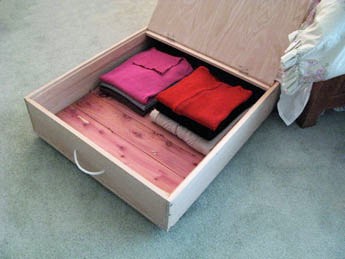
After going through this every six months for longer than I can remember, I’d just about had it. I decided I needed to find a creative, durable, low-cost solution. What did I come up with? A DIY under-bed storage. Yes, a real box made of wood and lined with cedar, which provides excellent protection against moths, mildew, and mustiness. On the sides, I attached rope handles and on the bottom, a set of wheels. That way, the box is easy to slide back and forth, even on my carpeting.
While the list of materials is long and may seem daunting, this project isn’t too complicated. But it does require an extra pair of hands. And as with most projects, you learn by doing. So, instead of having you screw the bottom frame, I am suggesting it be glued and tacked in place.
Supplies You Need
- a sheet of 1/4″ oak MDF or solid wood,
cut into ONE 24″ x 48″ piece and TWO 22 5/8″ x 23 3/8″ pieces - 1″ x 2″ x 8′ oak strips (actual size 1/2″ x 1 1/2″),
cut into TWO 48″ lengths, THREE 21″ lengths and ONE 22 1/4″ length - 1/2″ x 2″ x 4′ oak strips (actual size 1/4″ x 1 1/2″),
cut into TWO 46 1/2″ lengths and TWO 22 3/4″ lengths - 1″ x 6″ x 8′ oak boards (actual size 1/2″ x 5 1/2″),
cut into TWO 48″ lengths - 1″ x 6″ x 4′ oak boards (actual size 1/2″ x 5 1/2″),
cut into TWO 22 3/4″ lengths - 1 box cedar closet lining wood strips, tongue in groove,
cut into approximately FOURTEEN 22 3/4″ lengths - One 1/2″ caster wheels
- 6 Flat head wood screws, 1 1/2″ in length and 1 1/4″ in length
- 5/8″ brads
- 1/2″ brads
Tools You Need
- Hammer
- Cordless or handheld screwdriver ( You can find a precision screwdriver at Fiskars that works well.)
- Drill and drill bits
- Wood glue
- Clamps
- Sandpaper
- Hacksaw
- Hinges
- Furniture Wax
- Cloths
- Measuring tape
- Pencil
- Nylon rope 1/4″
- Tape
- Scissors
- Matches
- T-Square
Instructions
1. Sand all wood pieces smooth and wipe clean with the cloth.
 Make a frame for the bottom of the box.
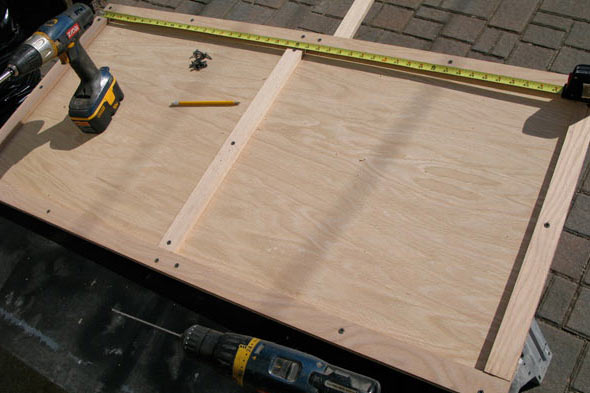
2. Make a frame from three 1″ x 2″ x 21″ strips and 24″ x 48″ oak piece. Lie the oak piece on a flat work surface. Align 48″ lengths along long sides of an oak piece with edges even. Measure and mark center point of 48″ lengths and align one 21″ length between both points. Sandwich two remaining 21″ lengths between long strips at both ends, edges even. Use wood glue to adhere strips to the oak piece then tack in place by hammering brads every few inches, starting at least 3″ from corners. This is the bottom of the box.
3. Next, on a hard surface (and with assistance), align one 48″ oak board along the long side of the top of the oak piece. Using a 1/8″ drill bit, drill pilot holes down through frame, oak piece and into a bottom of the board. Start at the corner and space holes about 12 inches apart. Avoid making a hole at the center point; instead go short or long by an inch or so. Using your screwdriver and 1 1/2″ screws, secure the board in place. Repeat for the second 48″oak board.
4. Sandwich one 22 3/4″ oak board between long board at one end. Secure in place in the same manner as above. Repeat on another end with remaining 22 3/4″ board.
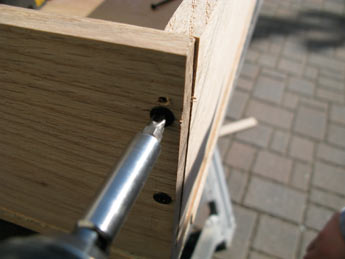 Secure the corners of the box.
5. Turn the box over so boards are face up. Drill pilot holes through 48″ boards into ends of shorter boards at corners. Use your screwdriver and 1 1/4″ screws to secure corners of the box.
6. Place cedar strips inside the box for fit. Determine if last board needs to be cut down lengthwise. If so, use the hacksaw to trim. Remove strips and replace in the bottom again using wood glue on the underside to secure to bottom of the box. Place heavy books atop until glue dries.
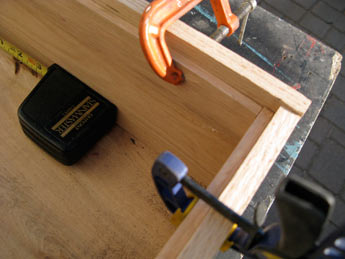 Add guide strips to the inside of the box.
7. Measure and mark along inside of box 1/2″ from top edge all around. Use wood glue to adhere a long 1/2″ x 2″ strip to the inside of box aligning top of the strip with marks for guides. Tack with 1/2″ brads, or clamp until dry.
8. . Sandwich remaining 1″ x 2″ strip (22 1/4″) between markings and flush to top edge of guides for cross bar. Drill a pilot hole through the outside of the box and the guide strip and into the center crossbar. Use screwdriver and 1 1/2″ screws to secure crossbar in place.

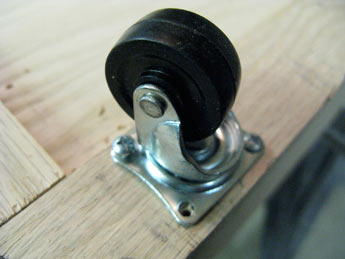 Secure casters to the bottom of the box.
9. Turn the box over and place casters about 2″ in from each corner and at center point on the long side of the frame. Secure in place with caster screws. Turn box right side up.
10. Set square-ish oak pieces atop guides inside the box for covers. Make certain there is 1/8″ space between pieces at center. Measure and mark along inside center, 3 inches in from side edges for hinge placement. Use a dab of glue and tiny screws to secure hinges to covers.
11. Measure and mark a spot center of the width of cover and 2 inches from outside edge for pulls. Repeat at another side. Remove cover and place on a hard flat surface with a scrap piece of wood underneath. Drill 1/4″ holes in covers at markings. Sand smooth.
12. Measure and mark the short end of the box to find center from top to bottom and side to side. Measure and mark a point 2 1/2″ inches on either side of marking. Drill two 1/4″ holes in box end at outside markings. Sand smooth and repeat at another end of the box.
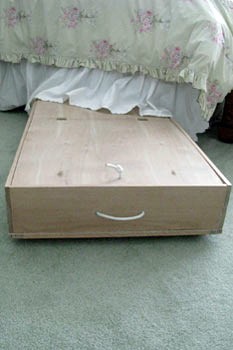 Under-Bed Storage boxMake rope pulls for easy access.
13. Use tape to secure an end of nylon roping. Measure and cut two 7″ lengths of rope tape to secure at cuts. Measure and cut two 12″ lengths of rope in the same manner.
14. Thread smaller lengths of rope through cover holes. Knot each end to secure and trim any excess. Use a match to burn and seal ends of the rope. Thread longer lengths of rope through box holes. Knot ends on inside of box leaving a loose handle on the outside. Trim any excess.
15. Finish outside of the box with furniture wax and dry clothes, according to manufacturer’s directions.