


How are you displaying your Christmas cards this year?
It’s that time of year or that week to be particular. The week when all of your friends’ and family members’ Christmas cards start rolling in en masse. Holiday cards are a joy to receive to be sure. But the tumbling avalanche that occurs when you add another card to the bunch? Not so much.
This year, I wanted a creative way to display our cards, not the old standby solutions, like displaying them on the mantel or hanging them from a ribbon or string. So I’m revealing the most unexpected ways to display cherished greetings. Here, several great ideas that are far from ho-ho-ho-hum.
Spell Out Christmas Cheer
I suggest going for maximum impact with minimal effort: Tear off strips of washi paper tape and stick the loveliest cards onto a bare wall to spell out words that invoke the spirit of the holiday: Nöel, Joy, Peace — even favorite song titles like Silent Night. The result? Walls that sing!
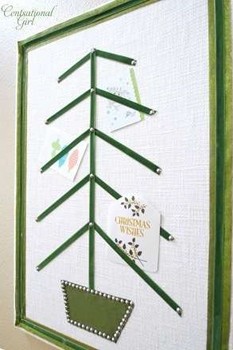
Grow A Ribbon Tree
Here’s a new DIY plan for showing off your holiday cards every year. This year I’ve “grown” a ribbon tree.
To do the same, you’ll need the following:
• 2×3-foot corkboard
• A Large piece of fabric (any color) for the background. It needs to be large enough to wrap around and cover the board entirely
• Small scrap of fabric (different color than background) to cut into a tree base
• 3 yards of ½-inch thick velvet ribbon (any color) for “branches.”
• 3.5 yards of 2-inch thick ribbon (a pattern is especially nice) for a border
• Staple gun
• Fabric glue
• Ball peen hammer
• Three packages of decorative nails
Step 1: Stretch the fabric as taut and evenly as possible over the surface, flip the board over, and fold the fabric under (to create a nice hem). Then staple it in place on one side at a time. Tip: It’s best to staple one side, stretch the fabric tightly again, staple the side directly opposite, then re-stretch and repeat on another side until all the parties are complete.
Step 2: Cut the ½-inch thick ribbon (for branches) into:
• Two 6-inch segments
• Two 8-inch segments
• Two 10-inch segments
• Two 12-inch segments
• Two 14-inch segments
Step 3: Cut the 2-inch thick ribbon (for border) into:
• Two 2-foot segments
• Two 3-foot segments
Step 4: Secure the ribbon “branches” of your tree by pounding decorative nails into the tips. Start with the topmost branches, using the shortest ribbon segments; the branches should increase in length as they travel down the tree trunk.
Step 5: Add the base of the tree; fold the edges under and use nails around its perimeter.
Step 6: Glue the 2-inch ribbon around the corkboard frame.
“Hang” your cards on the tree’s branches using thumbtacks.

Build A House Of Holiday Cards
I use greetings from Christmases past to build a holiday card house.
Step 1: Start by setting aside two of the prettiest cards for the walls.
Step 2: Grab a utility knife and carve out several windows and one (semi-attached) door.
Step 3: Construct a simple box by opening up the two cards and taping — or sewing both together with red or green embroidery thread via evenly-spaced punched holes — along the inner sides.
Step 4: Cut pieces of card “shingles” for the roof, and glue the shingles onto each other in an overlapping pattern. Then stick the finished roof onto the card house.
For added visual interest, use pinking shears to snip cute rutted edges. I like to mount the completed home on a piece of plain cardboard and surround it with peat moss and tiny plastic animals.
Bonus idea: Create a landscape around the house by using extra holiday cards to make tree foliage! Cut two or three other cards in half. Recycle the written sides. Roll the picture portions into loose or tight cones to make tree foliage. The secure inner edges with transparent tape. Cut a recycled-cardboard toilet-paper roll into thirds (it doesn’t matter whether it’s even; you want trees of different heights and widths). Glue the card foliage to the cardboard trunks. Settle trees into the peat moss landscape for a complete holiday cards homestead!